Overview
This article provides comprehensive maintenance procedures for Windows Server Update Services (WSUS) to ensure optimal performance and prevent common issues such as patch failures, timeouts (exit code 340), and GetUpdates operation errors.
Regular maintenance is essential for stable WSUS operations.
Common WSUS Issues
WSUS maintenance helps prevent and resolve issues such as:
- Patch failures and timeouts (e.g., exit code 340)
- GetUpdates operation timeout errors:
| Exception calling "GetUpdates" with "1" argument(s): "The operation has timed out" ... |
These issues are often caused by insufficient maintenance or improper WSUS configuration.
Basic Maintenance Operations
Before performing advanced maintenance, verify the following basic system requirements:
- Sufficient disk space availability
- Normal CPU consumption levels
- No memory leaks
- Network connectivity status
- WSUS specifications match the requirements outlined in Hardware and Software Specifications
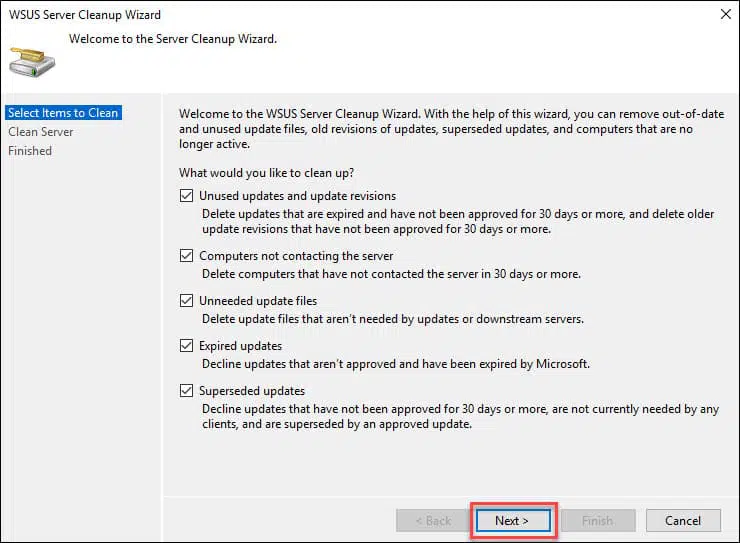
WSUS Server Cleanup (Manual Method)
To perform manual WSUS cleanup using the built-in wizard:
- Open the WSUS Administration Console.
- Navigate to Options > Server Cleanup Wizard.
- Select all cleanup options and proceed through the wizard.
- Upon completion, review the summary for details on recovered disk space, then click Finish.
Recommended: Automating WSUS Cleanup
For consistent maintenance, automate WSUS cleanup using PowerShell and Task Scheduler.
Step 1: Create the PowerShell Script
- Open Notepad and paste the following script (covers all cleanup tasks):
|
Invoke-WsusServerCleanup ` -CleanupObsoleteComputers ` -CleanupObsoleteUpdates ` -CleanupUnneededContentFiles ` -CompressUpdates ` -DeclineExpiredUpdates ` -DeclineSupersededUpdates |
- Save the file with the following specifications:
- File Name:
| WSUS-Cleanup.ps1 |
- Save as type:
| All Files (*.*) |
- Location:
| C:\Scripts\WSUS-Cleanup.ps1 |
Create the "Scripts" folder if it doesn't exist.
Step 2: Set Up Windows Task Scheduler
- Open Task Scheduler ()
| taskschd.msc |
- Click Action > Create Basic Task:
- Name:
| WSUS Cleanup |
- Click Next
- Trigger (recommended):
- Select Weekly or Daily (weekly is sufficient for most environments)
- Click Next
- Action:
- Select Start a Program
- Click Next
- Configure the following values:
| Field | Value |
| Program/script | powershell.exe |
| Add arguments | -ExecutionPolicy Bypass -File "C:\Scripts\WSUS-Cleanup.ps1" |
| Start in (optional) | C:\Scripts\ |
Click Next and then click Finish to save the task.
Step 3: Test Your Script
- Right-click your new task in Task Scheduler and select Run
- Monitor briefly to confirm it completes successfully
| Note: If your WSUS server hasn't been cleaned recently, the first run might take several minutes or even timeout. If it does timeout, run the task again manually a few times until it completes successfully. |
Advanced Maintenance: Database Reindexing
For large WSUS deployments experiencing performance issues, database reindexing may be necessary.
| Important: This procedure is relevant only for large WSUS deployments with performance issues and should not be used on WSUS 2.0 databases. |
The SQL script performs the following maintenance tasks on SUSDB:
- Identifies and defragments fragmented indexes
- Sets fill factors for certain tables to improve insert performance
- Updates potentially out-of-date table statistics
Database Maintenance Procedure
- Download the maintenance script: Maintenance Tasks on SUSDB.sql
- Download and start Microsoft SQL Server Management Studio, then connect to the database instance where the WSUS database is running
| Note: If you are using the Windows internal database, you must install Microsoft SQL Server Management Studio on the WSUS server and use as server name: using Windows authentication. |
| Note: If connection fails, change the connection settings to Encrypt=False |
2. Right-click on SUSDB and click on New Query.
3. Paste the script(copied from the attached Maintenance Tasks on SUSDB.sql) into the query box and click on Execute.
Wait while the request is being processed. Once the query is executed, the result is displayed under the messages tab
| Note: You can check if indexes already exist before creating them by downloading this modified script: Query-Maintenance-on-SUSDB.sql |
Database Size Reduction
To reduce the database size after maintenance:
- From SSMS, right-click on the database SUSDB
- Go to Tasks -> Shrink and click on Database
Click OK to start the database reduction.
Once optimization is complete, the window closes automatically.
Comments
0 comments
Please sign in to leave a comment.