Configure Publisher to Catalog (one-time setup)
- Open updates publisher
- Click on Catalog Workspace (lower left)
- Click on Add (not add catalogs)
- Catalog Path: http://catalog.jetpatch.com/JetPatch-Catalog.cab
- Publisher: JetPatch
- Name: JetPatch3rdPartyCatalog
- Description: JetPatch3rdPartyCatalog
- Support Contact: support@jetpatch.com
- Click OK
Importing Applications from JetPatch Catalog
Go back to Updates Workspace Tab (lower left), click on "Import," select JetPatch Catalog (if you don't see JetPatch Catalog please contact the Support) and then click "Next".
2. On the following page, please approve the certificate and click "Next".
3. (Optional) In Case you already imported some of the programs, a window will pop-up asking you to confirm if you want to replace/overwrite the existing updates. Please click on "Yes to All"
4. Once the updates are successfully imported you will see a summary of the imported and/or overwritten applications. You can click "Close".
Publishing Applications to WSUS
1. Select as many application updates as you need, then click on "Publish".
2. In the Publish option windows, select "Full Content" and then click "Next".
3. On the following page, the process of publishing will start and certificates windows will appear and ask you to accept each application's certificates. Please accept them all. The process can be long depending on the chosen updates. Please be patient.
Note2: you can configure automatic updates as well (see article).
Validation
In order to check if the application now shows in JetPatch, manually run of WSUS get updates full scan can be forced by appending the following to the JetPatch URL:/vmanage-server/rest/experimental/patch-governance/jobs/fetch-wsus/run?fullScan=true
Should look like this:
Note:
1. Run it only once. {} mean it was started successfully. It can take up to 20 minutes for new updates to appear in the Patches Catalog.
2. Make sure to select All in "Patches Status".
3. 3rd party updates do not show up in WSUS.
Resolving Publishing Errors
Step 0: If you encounter the error "The request was aborted: Could not create SSL/TLS secure channel.", please refer to this article. For all other publishing errors, follow these steps to resolve the issue:
Step 1: Verify Certificate Installation: Ensure that the certificate is properly installed in all three required locations on WSUS using the MMA console. You can verify this with the following PowerShell command:
$stores = 'Cert:\LocalMachine\Root',
'Cert:\LocalMachine\TrustedPublisher',
'Cert:\LocalMachine\WSUS'

foreach ($s in $stores) {
Get-ChildItem $s | Where-Object Subject -like '*WPP*'
}
The correct configuration will produce 3 lines of output.
If it's less than three, please verify that you added WPP.CER to the three needed locations on the WSUS server (see instructions)
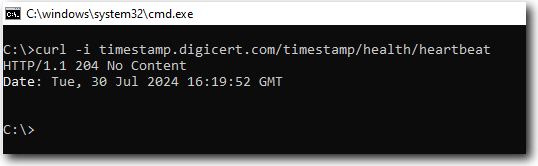
Step 2: Verify that WSUS can access http://timestamp.digicert.com
Note: The URL http://timestamp.digicert.com is not accessible via a browser. Attempting to access the timestamp URL via a browser will not confirm the status of the service.
To test whether the timestamp service is available, open a command prompt and run the following command:
curl -i timestamp.digicert.com/timestamp/health/heartbeatIf the service is available, you should receive the following response:
Step 3: Check File Accessibility: Confirm that you can download the file from the WSUS server catalog. Issues such as proxy or firewall settings might block the connection. Here are http and https links to check:
Ensure that the downloaded file retains the exact same name as provided in the link and downloaded as binary file and not text.
Step 4: Run a file download test using PowerShell (http and https), as it should utilize the same network configuration as the SCUP application (often different from browser settings). If the download fails, escalate the issue to the network team for further investigation and resolution.
Invoke-WebRequest -Uri http://catalog.jetpatch.com/10mb.msi -OutFile 10mb.msi
Invoke-WebRequest -Uri https://catalog.jetpatch.com/10mb.msi -OutFile 10mb.msi
After writing request stream, it will go away so it should look like this:
If this fails, escalate the issue to the network team for resolution.
- Note: if there is a proxy enabled, see this article
What's Next
Configure Windows Endpoints for 3rd Party Updates
Optional: Configure Jetpatch to support 3rd Party Updates (only if using pg.wsus.target-patch-categories, most users are not using this so please skip if you are not using it).
The following changes in WSUS scrips are made in intigua.properties file.
1. To edit configurations ssh JetPatch Application server and edit the intigua.properties file:
For versions Prior to 5.0:
/usr/share/tomcat/default/conf/intigua.properties
Post 5.0:
/usr/share/intigua/services/data/intigua-main/conf/intigua.properties
Do this step ONLY if using
pg.wsus.target-patch-categoriesIf you are using this property already, append at the end "Updates" to the list of items
Please refer to the article Relevant Patches to pull based on the patch classification
Note: any changes to the properties file then for versions prior to 5.0 restart tomcat(systemctl restart tomcat) and restart intigua-main(docker restart intigua-main) for post 5.0.
Comments
0 comments
Article is closed for comments.