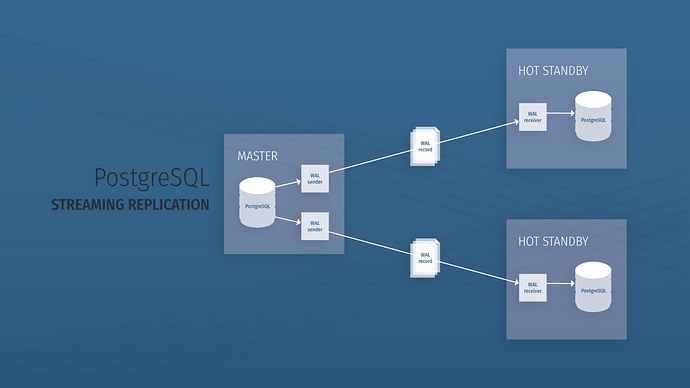
Objectives
Set up two VMs running Postgres
Configure the Primary server for replication
Back up the Primary server to the Standby server
Configure the Standby server to run in Hot Standby mode
Installation
You can follow the steps in https://www.postgresql.org/download/ to install PostgreSQL on both the master and standby servers. (Postgres version needs to be 11 or 12)
You need to configure the firewall so that both servers can communicate with each other using network port 5432.
Note down the IP address of both the servers.
Start the standby server and test it.
Setting up the master node
Creating Replication User
In this step, we will be creating a user with a replication role that will be used by the standby node.
Log in to the psql shell:
sudo -u postgres psqlCreate a replication user that will be used by the standby server to back up data from the master node:
create user repuser replication;Run \du+ to check if the user was created successfully.
Exit the shell.
Allow the standby to access the master node
In this step, we will configure the master node to allow the standby server for replication.
Edit pg_hba.conf (/var/lib/pgsql/10/data/pg_hba.conf) and add the following line at the end for all the standby nodes:
host replication repuser <Standby IP>/32 md5
Configure the master node for replication
After we have configured the master to allow access to the standby server, we need to edit postgresql.conf to allow replication.
Make changes to the following variables in postgresql.conf:
listen_addresses = '*'
port = 5432
wal_level = hot_standby
synchronous_commit = on   (If you want synchronous replication)
max_wal_senders = 4
hot_standby = on
Restart the PostgreSQL service (sudo service postgresql-10 restart) to reload the changes.
Set up the standby nodes
After we have configured the master node for replication, we now need to copy the same configuration as well as all the data from the master node.
Copy master data
Copy master data into slave nodes using:
pg_basebackup -h <Master IP> -U repuser -D /var/lib/pgsql/10/data/If you get an error "
/var/lib/pgsql/10/data/already contains data", empty the directory using:
sudo rm -r /var/lib/pgsql/10/data/*When the backup finishes, you’ll notice that the data directory is populated on the slave, including configuration files from the master.
Create Recovery.conf
When you implement a server in Hot Standby mode, you must supply a configuration file that contains the settings that will be used in the event of data recovery.
Create a recovery command file recovery.conf in the standby cluster’s data directory.
To add this file to the standby server, follow these steps:
sudo su postgres
psql
cd /var/lib/pgsql/10/data/
vim recovery.conf
Paste the following content:
standby_mode = 'on'
primary_conninfo = 'host=<Master IP> port=5432 user=repuser'
trigger_file = '/tmp/MasterNow'
Here is an explanation for each line:
standby_mode = 'on'— Specifies that the server must start as a standby serverprimary_conninfo— The parameters to use to connect to the mastertrigger_file— If this file exists, the server will stop the replication and act as a master
Start the PostgreSQL server:
sudo systemctl start postgresql-10and enable it.
Testing replication
If the server starts without any error, that means replication was successful.
Open a psql shell on both the servers.
On the master shell, run the following queries:
create sequence user_seq start with 1 increment by 1 no maxvalue minvalue 1 cache 1;

create table users(
    emp_id numeric primary key default nextval('user_seq'::regclass),
    first_name text not null,
    last_name text not null
);

insert into users(first_name, last_name) values ('Shubham','Patel');
insert into users(first_name, last_name) values ('Ashish','Shah');
On standby nodes run:
select * from users;
You should be able to see the entries from the master server.
You can also run the following query on the master node shell to get replication nodes:
select client_addr, state, sent_lsn, write_lsn, flush_lsn, replay_lsn from pg_stat_replication;
Comments
0 comments
Please sign in to leave a comment.