Installing JetPatch Overview
Process
If you haven't already, download the JetPatch VHD and Virtual Appliance Console Credentials.
- The download file contains JetPatch pre-installed on a Oracle Linux 8 server. The VHD is about 4.5 GB.
-
Select New Virtual Machine from the Hyper-V Manager.
-
Use the new Virtual Machine wizard to choose a location, name, and base memory size.
- General sizing information can be found here. it's very important to give to JetPatch Server the necessary resources.
-
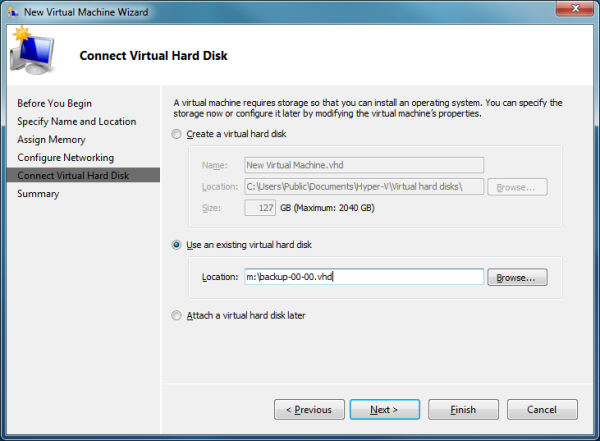
On the Connect Virtual Hard Disk page of the wizard, select Use virtual hard disk provided by JetPatch.
-
Complete the wizard and start the virtual machine.
-
It’s recommended to log into the VM with SSH and change the default root password, which is jetpatch123456. Log in as root, and you will be asked to re-enter and then change the password immediately.
Hostname Configuration
1. To configure the JetPatch server hostname you have 2 options:
-a. Using Network Manager Interface:
-
nmtui
- Then select "Set System Hostname" in the interface.
-b. Using manual command bellow:
- set HOSTNAME to the new hostname using the following command
-
hostnamectl set-hostname jetpatch.example.com
-
Make sure the hostname is accessible by local applications:
- Run:
hostname -f
If the correct hostname is returned, it is available to applications and you're done with this.
Dynamic IP Configuration
- By default, the VHD should be configured with a dynamic IP. To confirm, cat the network card. (Example: cat ifcfg-ens32)
If it is not set to DHCP, you can use "nmtui", otherwise, try the following:
- #vi /etc/sysconfig/network-scripts --- Path of the Network cards
- # vi ifcfg-eth0 or ifcfg-ens32 (depends system to system)
- Once the below details are added needed to restart the network service
- #systemctl restart network or service network restart (depends from system to system)
Static IP Configuration
Assign static IP to JetPatch server. Link to article
Login to the JetPatch Console
via chrome or firefox browser using https://<DNS-Name>/
Note1: If there is an issue, please review proxy settings.
Note2: If you have your own certificate, see this article.
Next Step
-
- Adding Endpoints to JetPatch
- Alternatively, view this first-time setup video
Comments
0 comments
Article is closed for comments.