It's possible to use JetPatch when you are working with local repositories. Here is the full guide on how to setup your environment and make sure all repositories are configured correctly and available for Jetpatch usage.
Please note that the instructions below are for setting up local repositories and are not related to JetPatch functionality.
Preconditions:
-
Local repository storage requirements are based on the number of repositories you are enabling and syncing from. If you are enabling only the repositories mentioned below, 150GB are enough, otherwise- we recommend allocating up to 400 GB.
- Local repository hardware specifications is based on the number of endpoints connecting to the repo
- Each operating system should have its own repository server. (i.e Repo for each of the following - RHEL 7, RHEL 6, CentOS 7..)
- Local repository must have Internet connectivity
Before we start:
- Please take under consideration the 'repo-sync' command, which might take 9-10 hours to complete.
- If you are familiar with the needed repositories in your organization, other than the suggested below, please configure them the exact same way.
Step 1: Setup Nginx on the Repo Server
1. First start by installing Nginx HTTP server from the EPEL repository using the YUM package manager as follows.
yum install epel-release
yum install nginx
2. Once you have installed Nginx web server, you can start it for the first time and enable it to start automatically at system boot.
systemctl start nginx
systemctl enable nginx
3. Next, you need to open port 80 and 443 to allow web traffic to Nginx service, update the system firewall rules to permit inbound packets on HTTP and HTTPS using the commands below
firewall-cmd --zone=public --permanent --add-service=http
firewall-cmd --zone=public --permanent --add-service=https
firewall-cmd --reload
4. Confirm that your Nginx server is up and running, using the following URL; if you see the default Nginx web page, all is well. http://SERVER_DOMAIN_NAME_OR_IP
Step 2: Create Yum Local Repository
5. Install the required packages for creating, configuring and managing your local repository.
yum install createrepo yum-utils
6. Create the necessary directories (yum repositories) that will store packages and any related information.
# mkdir -p /var/www/html/repos/{base,centosplus,extras,updates}
mkdir -p /var/www/html/repos/base
mkdir -p /var/www/html/repos/centosplus
mkdir -p /var/www/html/repos/extras
mkdir -p /var/www/html/repos/updates
7. Use the reposync tool to synchronize CentOS YUM repositories to the local directories as shown.
reposync -g -l -d -m --repoid=base --newest-only --download-metadata --download_path=/var/www/html/repos/base
reposync -g -l -d -m --repoid=centosplus --newest-only --download-metadata --download_path=/var/www/html/repos/centosplus
reposync -g -l -d -m --repoid=extras --newest-only --download-metadata --download_path=/var/www/html/repos/extras
reposync -g -l -d -m --repoid=updates --newest-only --download-metadata --download_path=/var/www/html/repos/updates
8. Create a new repodata for each repositories by running the following commands, where the flag -gis used to update the package group information using the specified .xml file.
createrepo -g comps.xml /var/www/html/repos/base/
createrepo /var/www/html/repos/centosplus/
createrepo /var/www/html/repos/extras/
createrepo /var/www/html/repos/updates/
9. To enable viewing of repositories and packages in them, via a web browser, create a Nginx server block which points to the root of your repositories as shown.
vim /etc/nginx/conf.d/repos.conf
Add the following configuration to file repos.conf:
server {
 listen 80;
 server_name repos.test.lab; #change test.lab to your real domain or IP address
 root /var/www/html/;
 location / {
 index index.php index.html index.htm;
 autoindex on; #enable listing of directory index
 }
}
10. Then restart your Nginx server and view the repositories from a web browser using the following URL.
http://repos.test.lab
Step 3: Create Cron Job to Synchronize and Create Repositories
1. Add a cron job that will automatically synchronize your local repos with the official CentOS repos to grab the updates and security patches.
vim /etc/cron.daily/update-localrepos
Add these commands in the script:
#!/bin/bash
##specify all local repositories in a single variable
LOCAL_REPOS=”base centosplus extras updates”
##a loop to update repos one at a time
for REPO in ${LOCAL_REPOS}; do
reposync -g -l -d -m --repoid=$REPO --newest-only --download-metadata --download_path=/var/www/html/repos/
createrepo -g comps.xml /var/www/html/repos/$REPO/
done
Save the script and close it and set the appropriate permissions on it.
chmod 755 /etc/cron.daily/update-localrepos
Step 4: Setup Local Yum Repository on Client Machines
1. On your CentOS client machines, add your local repos to the YUM configuration. (or run the provided script "create-repo-jetpatch-centos")
vim /etc/yum.repos.d/local-repos.repo
[local-base]
name=CentOS Base
baseurl=http://repos.test.lab/base/
gpgcheck=0
enabled=1
priority=1

[local-centosplus]
name=CentOS CentOSPlus
baseurl=http://repos.test.lab/centosplus/
gpgcheck=0
enabled=1
priority=1

[local-extras]
name=CentOS Extras
baseurl=http://repos.test.lab/extras/
gpgcheck=0
enabled=1
priority=1

[local-updates]
name=CentOS Updates
baseurl=http://repos.test.lab/updates/
gpgcheck=0
enabled=1
priority=1
Save the file and start using your local YUM mirrors.
Use the instructions to learn how to configure local repository on all client servers
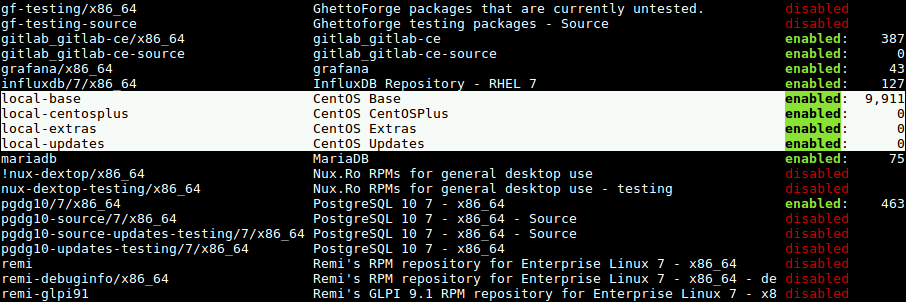
2. Run the following command to view your local repos in the list of available YUM repos, on the client machines.
yum clean all
yum repolist all
Error Handling
1. If you're encountering the following error when installaing nginx: yum error “Cannot retrieve metalink for repository: epel. Please verify its path and try again” updating ContextBroker
Solution:
Edit both /etc/yum.repos.d/epel.repo and /etc/yum.repos.d/epel-testing.repo files commenting all entries starting with mirrorlist=... and uncommenting all the entries starting with baseurl=.... ;
run again yum install nginx
2. If files do not appear when viewing the repositories from web browser:
Solution: restorecon -R /var/www/html/repos
3. If you have any issues such as Error 404 page not found it might be related to your nginx configuration. To view nginx errors go to /var/log/nginx/error.log . Errors might be related to nginx configuration (etc/nginx/conf.d/repos.conf). Please make sure you configured it properly.
4. In case you have changed configurations (in repo server) do not forget to run 'yum clean all' and 'yum repolist all' afterwards. If you have changed nginx conf. restart nginx service.

Comments
0 comments
Please sign in to leave a comment.